Butter, Part II
For many children their first lesson in food chemistry is to watch a jar of heavy cream be shaken like a dairy martini into shiny, soft globs of butter. The transformation is a revelation and a lasting memory and for kids (and alas, many adults) who need to be taught that food does not naturally come out of a box.
Moreover, at a time when many of us are concerned about where our food comes from, there is an allure to making our own butter from a pint of organic heavy cream from a local dairy farm where we could meet the cows.
More than once I have almost unintentionally made butter when I got a little too aggressive whipping cream. Of course this wouldn't have been very tasty since this butter would have been made from generously sweetened cream, boosted with a little vanilla. Not so good.
But intentionally making your own butter can produce a luxurious result. It's easy to do and certain tips will get you a better result.
Making Butter
It doesn't take much agitation to convert heavy cream to butter and some theorize that butter was discovered when the simple farm task of carrying a bucket of rich milk from the barn to the kitchen did enough jostling to produce butter.
In our modern kitchens it takes a bit more technique but not much. The only ingredient is heavy cream, preferably organic. Use about a pint. For equipment you'll need an electric mixer, a food processor, or a glass jar with a tightly fitting lid. If you use a glass jar, you'll also need a strong arm that can give a steady, firm shake for three or more minutes. The final equipment you'll want on hand is a piece of cheesecloth and a fine-hole sieve.
- Begin by leaving the cream unrefrigerated, sitting at room temperature for about 8 hours. During this time the cream will slightly sour, letting the lactic acid bacteria become active and cultivating the cream. This step will help the butterfat more easily separate from its water content and also create a fuller flavor.
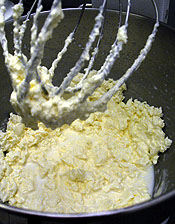
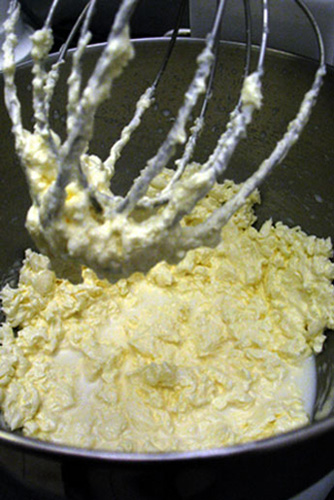
- Choose your method of agitation. If using a jar, add the cream and tightly cover. Shake the jar continuously, as if playing the maracas, until you see that the fat globules have separated from the water, about 5 minutes of continuous shaking. If using a food processor, process the cream at high speed for 5 to 8 minutes, again until the fat globules take shake. If using an electric mixer, which I think is the best choice, use the whisk attachment -- as you would when making whipped cream. Begin at low to prevent any cream from splashing out of the bowl and then raise the speed to medium high for 7 to 10 minutes. Watch the mixer because the separation of the fat globules from the liquid happens quickly and you'll suddenly have a splashing of buttermilk all over your kitchen.
- Drain off the buttermilk, working carefully so that you capture all the little globs of butter, which will be visible but very, very soft. If you like buttermilk, save it to drink later but the whey-like liquid that you'll produce will be thinner than the cultured buttermilk we buy by the carton.
- Rinse the butter in very, very cold water. If the coldest water from your tap isn't icy cold, have a big bowl or pot of ice water handy. You need to rinse the globs of butter until the water is clear, and if the water isn't icy cold, the bits of butter will melt. This step is important because if there is any remaining buttermilk, your butter will quickly become rancid, even if you refrigerate it.
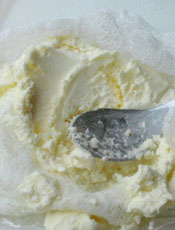
- Transfer the washed butter to a sieve lined with cheesecloth. Wrap the cloth around the butter and use your hands to squeeze out any remaining liquid or else use a flexible spatula to knead any last liquid out of the butter.
- If you want salted butter, add fine sea salt after you've finished removing all the liquid, kneading in about one-half teaspoon of salt.
Two provisos: when I made my own butter the cost of a pint of local, organic heavy cream cost more than a pound of the best Irish or Normandy butter at my favorite markets.
And second, home-made butter spoils very quickly. Mine became sour within three days of making it, probably due to my not completely removing 100% of its liquid despite my valiant effort. Would I make it again? Probably not, mostly because I just don't cook with that much butter on a regular basis but if I had a child I was beginning to teach about where food comes from, it very well could be lesson number one.
How To Cook With and Eat Butter
Whether you make your own or buy it at the supermarket, butter adds a uniquely rich, warm and satisfying flavor to so many of our foods.
Even for those of us who try to keep butter at a minimum in our diets, there are times when there is simply no substitution. My favorite way to enjoy butter is spread on a piece of doughy fresh baguette with slices of fresh, peppery radish, and a pinch of salt. I can -- and on occasion have -- made a meal of this. We all can taste the difference between a pie crust made with butter versus shortening, or consider that little dish of melted butter mandatory for any steamed lobster.
But I also know that butter can be seriously overdone in cooking. If you spend any time in a professional kitchen or culinary school, you discover how butter becomes a gastronomic band-aid. Need to thicken a sauce in a hurry? Add butter. Need to mask an overcooked piece of fish? A little butter poaching could solve that. Are the asparagus tasteless today? Well, you see my point.
But its judicious use can transform a simple stew into something complex, make a tomato sauce silken, and add luxury to a bargain meal. Here are some ways to cook with butter:
- Frying. When needing a fat for frying or sautéing, butter adds flavor whereas most vegetable oils, including olive oil, do not. But it burns, or at least browns, at a lower temperature (what browns are the milk solids in the butter). This is why you sometimes see a recipe call for a combination of oil and butter: the oil lets you cook at a higher temperature and the butter adds flavor. Plus by mixing fats, using mostly oil and just a little butter, you can improve the healthy quotient.
- Brown butter. When heated at a medium high to high temperature in a fry pan, butter will first melt and then brown just like any other solid food. Classic French recipes with descriptive names -- "beurre noisette" (hazel) or "beurre noir" (black) -- turn browned butter into a rich sauce with the addition of a squeeze of fresh lemon juice or a little wine vinegar that stops the browning and adds an acidic interruption to the unctuous melted butter. A popular use of this method is skate cooked with beurre noir.
- Poaching. Cooking something immersed in melted butter may be a little too Thomas Keller-decadent for some of us, but in fact it can produce an extraordinary result, especially for delicate flavors such as lobster or scallops. It's similar to making a confit de canard in which duck legs are poached in duck fat or poaching garlic cloves in olive oil. The result is far less oily/greasy than you would imagine but the flavor is very rich.
- Baking. Butter is an essential ingredient for most pastries -- pie crusts, cakes, scones, shortbreads, and of course, puff pastry. While other fats can be used in many pastries, for some there just shouldn't be any substitutions.
- Sauces. Butter is a main ingredient in a bechamel or white sauce, a beurre blanc, in Hollandaise, and other exquisite sauces. When using butter in a sauce, use unsalted.
- Beurre manié is a compound of equal amounts of all-purpose flour and a knob of butter. You knead the two together with your fingers, making a paste which when added to a sauce or stock can thicken the texture and enrich the flavor. The best example of how to use this method is making gravy by adding flour and butter to the roasting pan drippings and turkey stock.
- Compound butter. This is when plain butter is mixed with another ingredient; when placed on a hot surface the combination melts to add flavor. A popular example is garlic butter spread on warm bread or added to seafood. Another is butter mixed with fresh herbs or blue cheese to serve with grilled meats.
- As a flavoring or garnish. This is how most of us primarily use butter -- as a final and small flavor added to a food that is otherwise cooked without any fat. Such as on a baked potato with a snip of chives, as a gloss to a pile of steamed spinach, on hot rice with a dusting of Parmesan, or on a toasted bagel followed by a favorite jelly. It is best on foods that are warm, where the butter can melt and a little will go a long way.