
Making Ravioli
Labor-Intensive But So Worth It
- Servings: Makes about 30 3-inch square ravioli.
Why make your own ravioli? With great sources for fresh pasta across the city, we can avoid all the effort. But sometimes we want a specific filling inside the soft, tender egg pasta pillows. And other times we just want the satisfaction of putting it all together ourselves.
Tip: Some will suggest using wonton wrappers, instead of fresh pasta, as a short-cut, but I've never found the taste or the mouth feel to be very satisfying. It works but it's a big compromise.
So if you've fantasized about making giant single-portion-sized ravioli filled with basil pesto and a runny egg yolk that's dressed with melted butter and a grate of pecorino, or round ravioli containing a pureé of veal and herbs that you'll toss with a light tomato sauce, or tiny raviolini filled with shredded and wilted radicchio -- many fresh pasta shops around the city sell pristine sheets of fresh pasta dough, meaning they aren't dusted with corn meal, which would interfere with making your ravioli without corn meal getting into your filling.
If you can't find a source for sheets of fresh pasta dough (although here are four superb sources: Rafetto's in Manhattan, Borgatti's in the Bronx, Russo's in Brooklyn, and Cassinelli in Queens), we've included a simple food processor recipe for making your own pasta dough.
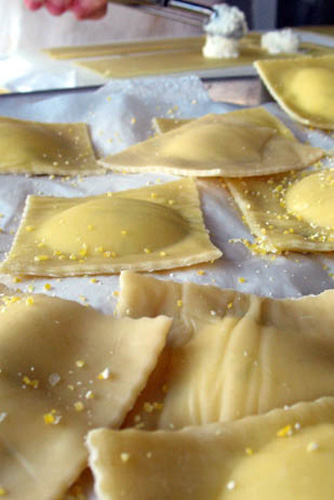
Tips and Advice for Filling, Cutting and Assembly
Since this was my first experience in making my own ravioli, I took a traditional approach and made ones with a classic ricotta cheese filling. The filling is quick and simple to make. The assembly, however, is a bit of a task. It doesn't take skill but it does take time and patience.
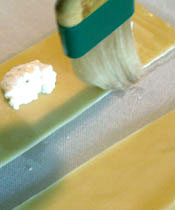
- Find a place to work that has some space. I moved out of the kitchen and onto the dining table. Set up your work area and production line in advance, with a sheet pan lined with parchment paper to take the finished ravioli, and a dish of cornmeal handy to sprinkle on top of the finished pieces to keep them separated after they've been assembled.
- Whether you've bought or made your own pasta dough, keep it covered in a damp, clean kitchen towel so that it doesn't dry out while you work with other pieces or ingredients.
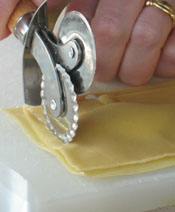
- Invest in a ravioli wheel/cutter (about $10) that has two parts: a cutter that resembles a small pizza knife and a serrated-edged cutter that when pulled along each ravioli's edge will seal it, keeping the filling intact when cooked in boiling water. Some stores may call this a pastry cutter.
- A tiny ice cream scoop is a perfect tool to spoon the filling onto the pasta dough, but absent that, a teaspoon is fine. Just be consistent in the amounts you spoon, work as neatly as you can, and don't over-fill the ravioli.
- Key to success is having the ratio of filling-to-dough be reasonable and the edges all well sealed (the egg wash helps but the serrated cutting is essential). Otherwise your ravioli may open up when cooked in boiling water and what a mess that will be.
If you want something even more ambitious, we've included a link to a recipe for Beet Ravioli with Poppy Seed Butter from Bon Appétit magazine. Once you get the process, there's no end to the combinations you can make.
Ingredients
- Filling:
- 1 1/4 cups ricotta. Regular full-fat ricotta has a slightly richer taste and more substantial texture than skim milk ricotta and therefore is preferable to use.
- 1 cup grated parmigiano-reggiano. You can grate either by hand or in the food processor.
- 1/3 cup finely-chopped parsley (flat-leaf)
- 1 egg yolk
- Generous pinch of salt and several grinds of fresh pepper.
- Egg Wash:
- 2 egg whites with 2 tablespoons water, combined well with a fork to fully emulsify
- Pasta:
- Buy 4 large sheets of pasta dough -- each sheet being about 20-inches by 9-inches.
- Alternatively, make your own pasta dough.
- Pasta Dough:
- 2 cups all purpose flour
- 3 large eggs
- 1 teaspoon water
- 1 teaspoon olive oil
- 1 teaspoon salt (use a finer-grain salt, not coarse sea salt)
Directions
- Making the Pasta Dough:
- Place all ingredients into a food processor and combine until the mixture begins to form a ball.
- Remove from the processor and place on a floured work surface. Knead by hand, adding flour if necessary, until the dough become smooth and elastic.
- Flatten the dough into a manageable-sized rectangle and feed through the rollers of a pasta machine (either electric or hand-roller) set at the widest setting.
- Run the dough through the pasta maker 6 to 8 times, each time turning the dial down to make the dough thinner.
- Don't make the dough paper-thin because it could tear when you work with it. But do make it thin enough (1/16" is good) to be half the thickness of the final ravioli because remember that you'll use two layers for the final, filled pieces.
- Making the Filling:
- In a large bowl combine all the ingredients. Taste to make sure the seasoning are right. Set aside until you're ready to assemble.
- Assembling the Ravioli:
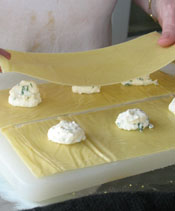
- Cut your fresh pasta into strips of manageable size. To make finished ravioli pieces that are each about 3-inches square, it's best to make only three at a time -- more than that will become unwieldy so resist trying to make a table-surface worth of ravioli. With this in mind, cut strips that are each about 9-inches by 3 inches.
- Using a very small ice cream scoop with about a teaspoon capacity or a teaspoon, place a heaping teaspoon of ricotta filling on the strips, each about 3-inches apart. Be consistent in the amounts for each ravioli.
- Using a pastry brush, brush a light amount of egg white wash around the ricotta filling.
- Place another 9-inch by 3-inch strip of pasta dough on top of the one with the ricotta and using your fingers, gently press around all the edges and in between the mounds of cheese filling. Carefully push excess air out of the pockets but don't push the cheese filling out. Your goal is to seal each pocket without tearing the dough.
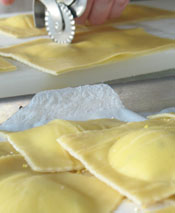
- Using the serrated edge of your ravioli cutter, cut each pocket into its own separate parcel, trimming each edge to fully seal it.
- Final Cooking:
- When you're ready to serve and eat the ravioli, bring a very large pot of salted water to a boil.
- Cook the ravioli about 3 to 4 minutes. Do not overcook. Drain carefully.
- Serve with a favorite tomato sauce, chopped fresh tomatoes, a basil pesto, or just some grated Parmesan and freshly ground black pepper.
Tip: If you don't have a pasta maker, you could roll out the dough with a rolling pin but keep the same goal of large sheets of smooth and thin dough.
Tip: This process for assembly is used regardless of the filling or the size of the ravioli. The final cooking time, however, may vary with ravioli that are much larger or much smaller. It will depend upon the volume and thickness of the dough so when cooking, test carefully to know when the ravioli will be done -- if in doubt, take one out of the water, cut it and taste it.
Tip: If you're not going to cook the ravioli right away, keep them on a sheet pan lined with parchment paper and sprinkle corn meal in between the pieces to keep them from sticking. Then cover the entire sheet with plastic wrap and refrigerate. Otherwise the dough can soften too much and everything will get stuck together.
Tip: Leftover pieces and scraps of the pasta dough can be saved and cooked in any pasta dish. They may appear odd and rag-tag, but they'll taste delicious and can be dressed with sauce or added to soup.